
Hosting Ghost: AWS Lightsail and S3
I've recently moved this site over to Ghost and am loving it! For my testing and tinkering, I used a docker container on my local Unraid server. But didn't want to self-host for the actual site. I've been wanting an excuse to play with AWS, and decided this was the perfect opportunity to dive in.
During the installation, I ran into a couple of pitfalls. But, if you follow the below steps, you'll avoid my issues and have Ghost set up in no time.
The only prerequisite to this guide is having your own domain name. I wanted to test Ghost out before I committed, so hosted on a sub-domain. I've included how to make this change at the bottom of this post.
Lightsail Instance
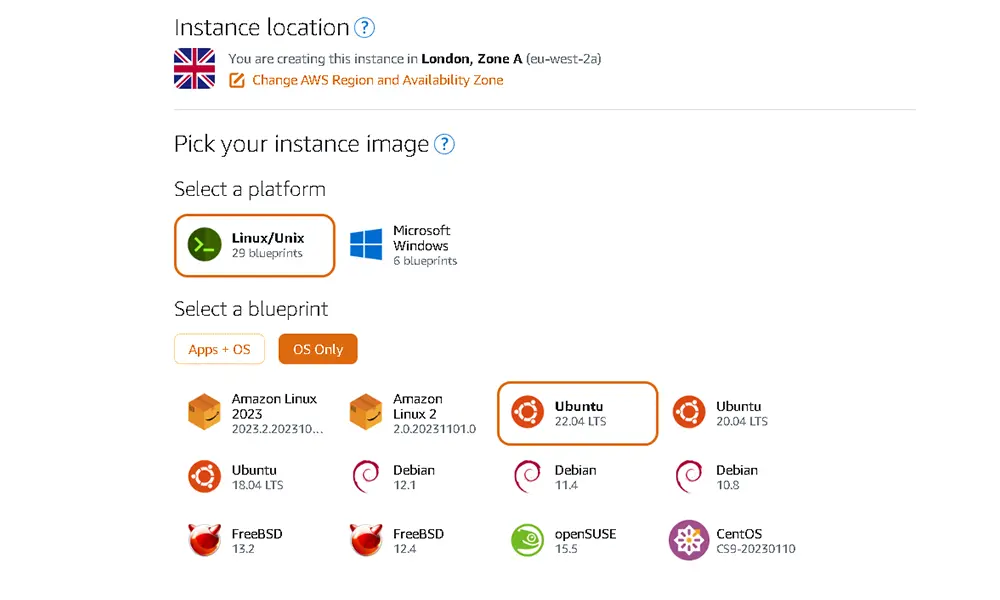
AWS offer quite a range of different services for lots of different purposes. Lightsail stood out as the ideal platform, with website hosting listed as one of its key uses.
When deciding which Lightsail instance was required, I checked the hosting docs on Ghost's site. It included a system requirement of at least 1GB of memory, as well as listing the supported version of Ubuntu. Using this as a baseline, I picked an Ubuntu 22.04 LTS image at the $5 USD tier. Knowing I could always upgrade later down the line if required.

Matching the above settings and giving your instance a name, you will then be able to access your new server in a few minutes.
The easiest way to access your server is via the Terminal icon (as pictured below). Clicking this icon will open an SSH terminal in your web browser, logged in the ubuntu user.
Network Tweaks
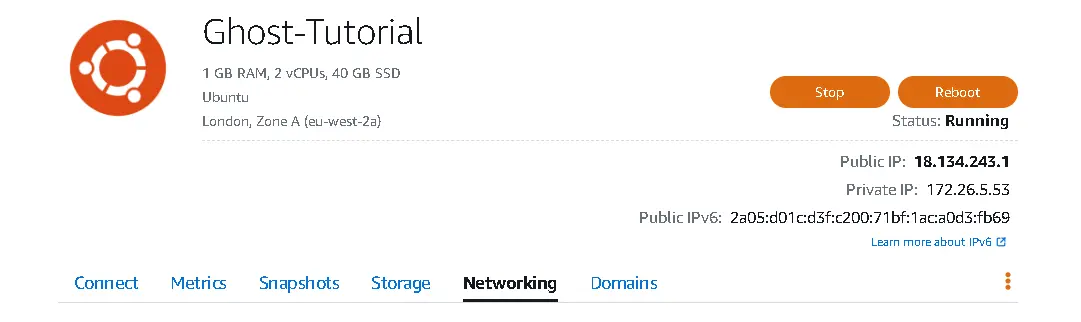
There are a couple of adjustments needed for the network. The first is enabling HTTPS in the AWS portal. To do this, click on your instance and navigate to the Networking Tab.
Scrolling down this page, you will see the option to 'Add rule' under IPv4 Firewall. Click this and change the 'Application' dropdown to HTTPS, and hit the 'Create' button.
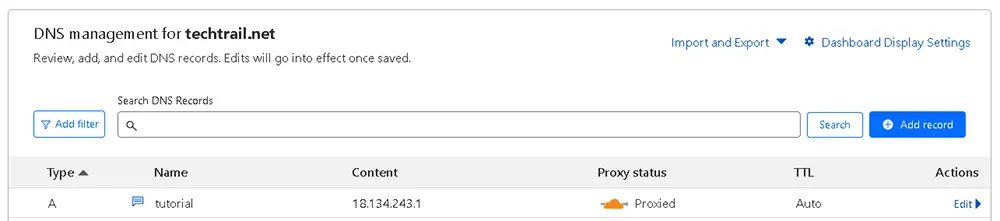
Next, we will want to point our domain at our new server’s IPv4 address using an A Record. Setting this will vary for different domain registrars. If unsure, a quick Google will give the answer!
If, like me, you picked the 1GB tier, you will find it works fine for almost all aspects of Ghost. However, I kept running into issues during the installation caused by a RAM bottleneck. Luckily, there is a solution that doesn't require upgrading to a higher tier instance.
Using a Swap!
A swap (sometimes called virtual memory) is a nifty way of using disk space, on a hard drive or SSD, as a supplement to the machine's RAM. This disk memory won't be as fast as the RAM, but allows the server to swap in and out data, putting less urgent data into the swap.
There are many pros and cons to using Swap Memory, but for our purposes, it will work perfectly! If you are using a higher tier of Lightsail, with more RAM, you can skip this step and go straight to Ghost Prerequisites.
Setting up a Swap
For our use case, we will allocate and create a 1GB swap file, which proved more than enough during my testing and installation. To create the swap and assign permissions, enter the following commands:
sudo fallocate -l 1G /swapfile
sudo chmod 600 /swapfile
To check that this has correctly works we can run the below command:
ls -lh /swapfileThe output in your console should match the below, but most likely with a different date:

You can now make this into a swap space and enable its use by our system with the following commands:
sudo mkswap /swapfile
sudo swapon /swapfile
Verify that this swap is now active and available with the below command:
sudo swapon --showThis will output the newly created swap's information, including its name, size, and utilisation. We can also check the swap is available as memory, with the below. The output should list both the system's RAM and the newly created swap:
free -hThe last step for the swap will be to make it permanent. As currently, if we reboot, we lose the swap. Run the following commands to back up the fstab (Filesystem Table), and then add the swap to it:
sudo cp /etc/fstab /etc/fstab.bak
echo '/swapfile none swap sw 0 0' | sudo tee -a /etc/fstab
Ghost Prerequisites
As with any Linux box, the first step is to make sure all your package lists and packages are up to date. To do this, run the following commands:
sudo apt-get update
sudo apt-get upgrade
During the upgrade process, it will prompt you to confirm an upgrade or two. Follow the on-screen instruction by press Y then hit Enter.
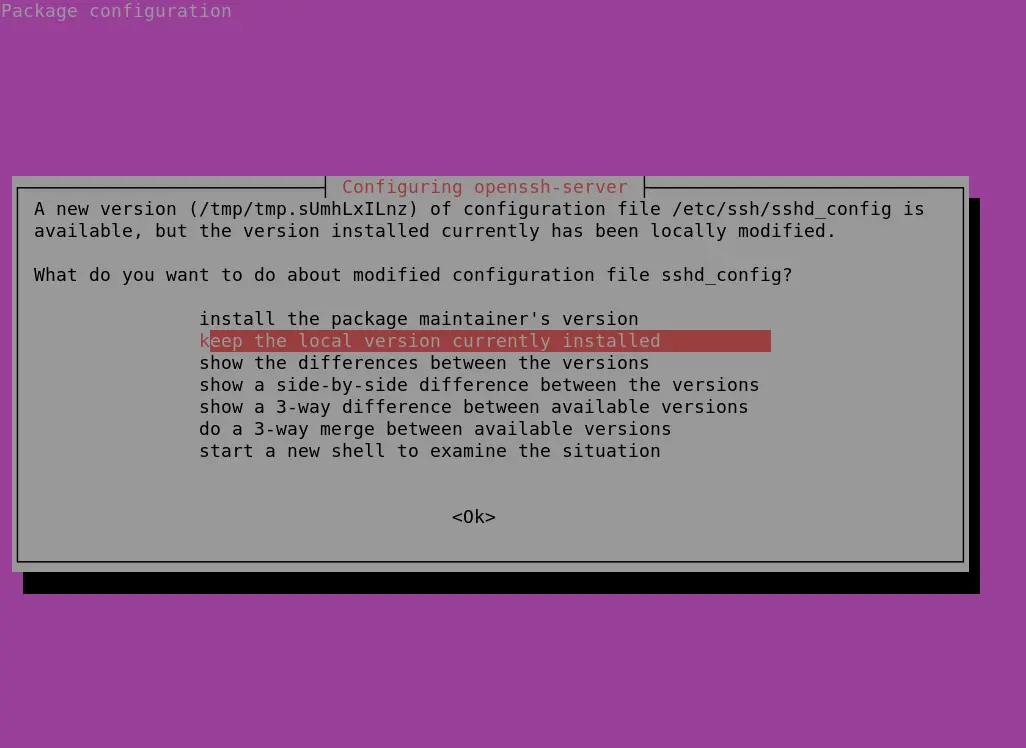
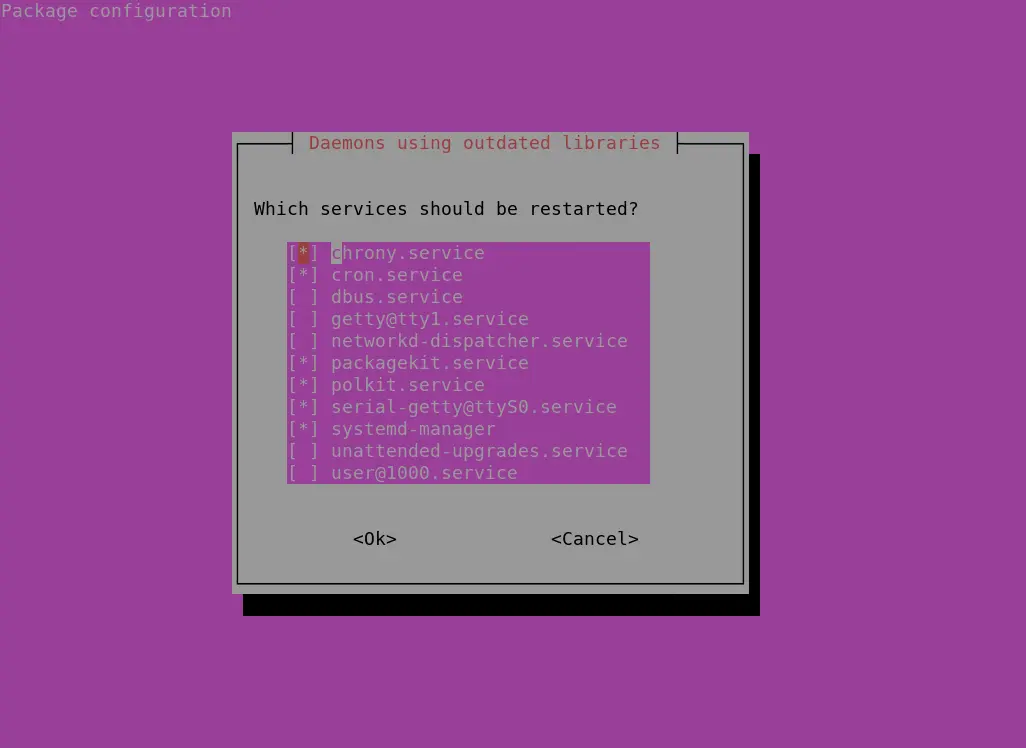
When shown the below screens, hit Enter as we do not want to change the mentioned file or restart any services. We will reboot the whole machine shortly.
NGINX
The next requirement will be to install Nginx. This is the web-server used by Ghost, also providing the required SSL encryption. To install this, use the below command, again hitting Y, then Enter when prompted. Skipping the purple screen with Enter:
sudo apt-get install nginxThe AWS instance comes packaged with ufw (Uncomplicated Firewall). This means to allow HTTP and HTTPS traffic, we must tell ufw to allow Nginx. This is done with the following command:
sudo ufw allow 'Nginx Full'MySQL
Next, we will need to install MySQL. Which acts as the production database for Ghost. To install this run the following command:
sudo apt-get install mysql-serverAfter installing MySQL, we need to change the MySQL root password to something secure, as Ghost uses this to create its database and user. To do this, run the below command:
sudo mysqlThis will open up the MySQL monitor. Here we can set the root password with the following, substituting changeme for your secure password.
mysql> ALTER USER 'root'@'localhost' IDENTIFIED WITH mysql_native_password BY 'changeme';
Exit out of MySQL with the command ‘exit’. Changing this password requires you to input your password when running MySQL monitor, and is done with the below command:
sudo mysql -pNode
The penultimate prerequisite for Ghost is node. Ghost recommends a particular version of Node (at the time of writing, v18 LTS). If you want to read more about the reason for this specific version, or double check this is still the recommended version, you can read about it here.
For Node, first download and import Nodesource's GPG key (GNU Privacy Guard). To do this, run the below set of commands:
sudo apt-get update
sudo apt-get install -y ca-certificates curl gnupg
sudo mkdir -p /etc/apt/keyrings
curl -fsSL https://deb.nodesource.com/gpgkey/nodesource-repo.gpg.key | sudo gpg --dearmor -o /etc/apt/keyrings/nodesource.gpg
Next you'll want to set the version of Node being used, and then create the deb repository for it by running the following commands:
NODE_MAJOR=18
echo "deb [signed-by=/etc/apt/keyrings/nodesource.gpg] https://deb.nodesource.com/node_$NODE_MAJOR.x nodistro main" | sudo tee /etc/apt/sources.list.d/nodesource.list
With this done, you can now run a final update and then install node itself:
sudo apt-get update
sudo apt-get install nodejs -y
Ghost-CLI
Before setting up Ghost itself, you will need to install Ghost-CLI. This is a command-line tool that will let you install and configure your ghost setup quickly and easily. To install Ghost-CLI, run the below command:
sudo npm install ghost-cli@latest -gGhost Install
With the prerequisites installed, we can now move to installing Ghost. First, we’ll want a directory to house our website. We will also need to set the directories ownership and permissions. To do this, run the following commands:
sudo mkdir -p /var/www/examplesite
sudo chown ubuntu:ubuntu /var/www/examplesite
sudo chmod 775 /var/www/examplesite
cd /var/www/examplesite
With our directory setup, we can now start the Ghost install! To do this, run the following command, whilst in the path set above:
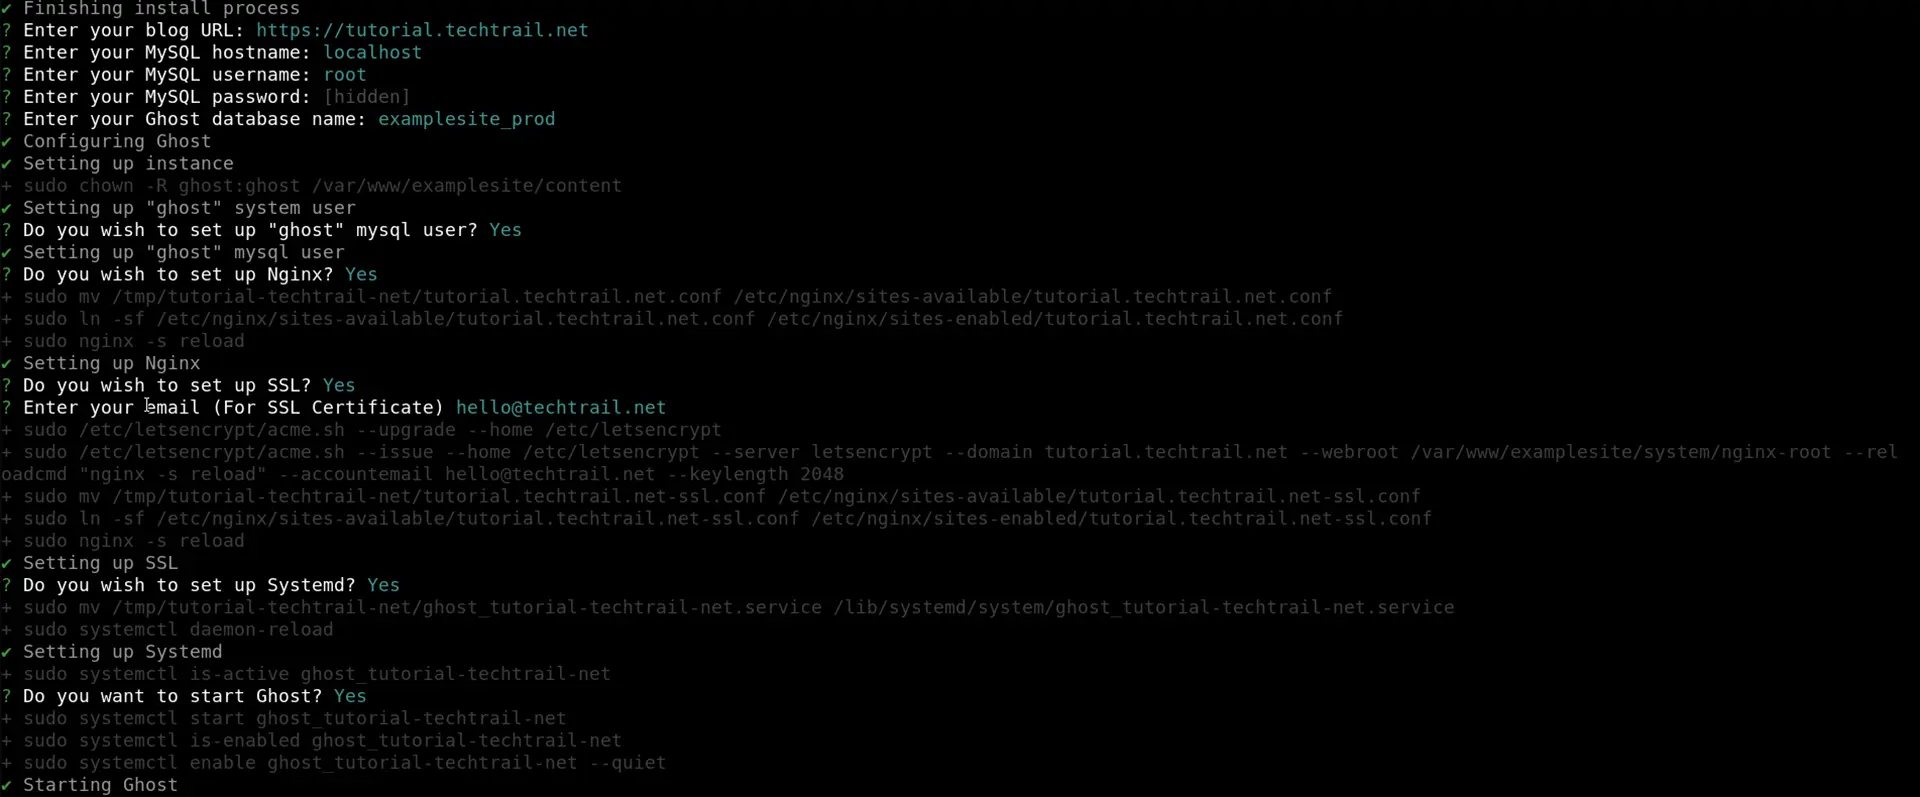
ghost installDuring this installation process, Ghost-CLI will ask you a series of questions relating to your installation:
- Enter your blog URL: Enter your domain name that you pointed the A Record at earlier, led by https://
- Enter your MySQL hostname: Leave this as localhost, as we are hosting them on the same instance
- Enter your MySQL username: Enter root, Ghost-CLI create a dedicated user for us
- Enter your MySQL password: Enter the MySQL root password set earlier
- Enter your Ghost database name: Leave this as the default
- Do you wish to set up "ghost" MySQL user? Hit Y then Enter.
- Do you wish to set up Nginx? Hit Y then Enter.
- Do you wish to set up SSL? Hit Y then Enter.
- Enter your email (For SSL Certificate) Enter an email address you have for any correspondence from Let's Encrypt.
- Do you wish to set up Systemd? Hit Y then Enter.
- Do you wish to start Ghost? Hit Y then Enter.
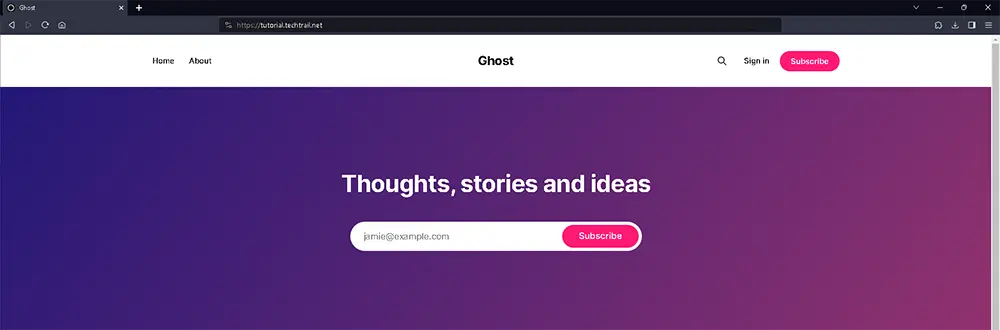
You now have a fully fledged instance of Ghost running on AWS Lightsail! If you're not wanting to muck around with S3, this will be more than suitable. Just head to https://yourdomain.url/ and start blogging!
However, if you want to offload your Ghost sites' media without worrying about filling up your Lightsail's storage, follow the below!
S3 Bucket
S3 (Simple Storage Service) is another one of AWS' services for hosting files for storage and access! For most of us, this service will be inexpensive, and you can see the full breakdown of the costs available here.
The first step will be the S3 bucket itself, which we can do via the AWS portal. I highly recommend hosting your bucket in the same region as your Lightsail instance.
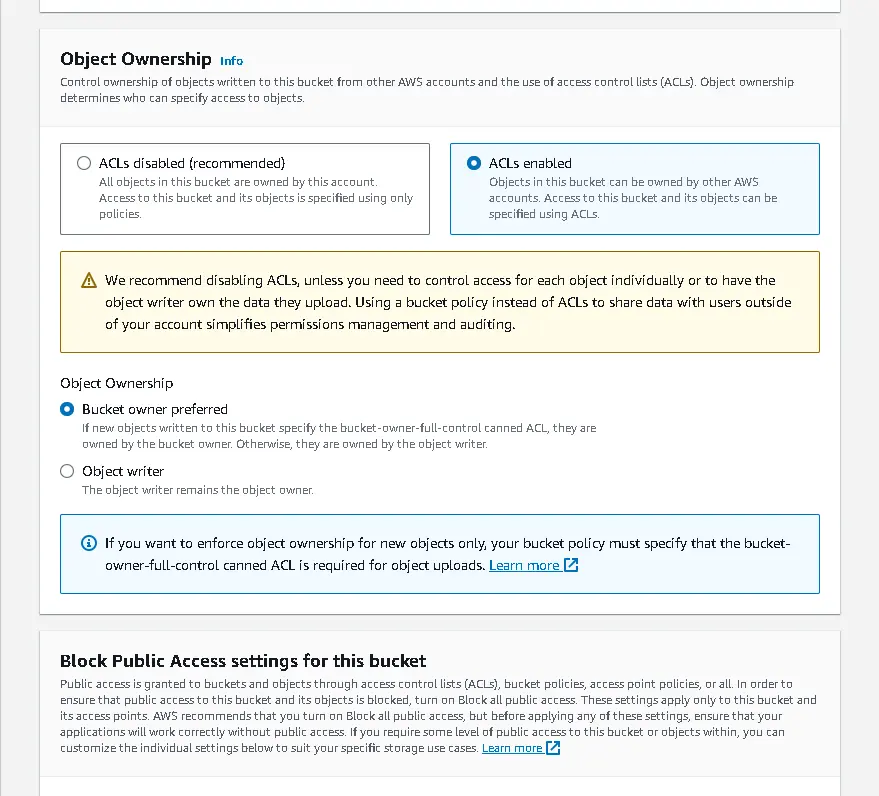
As we want the files to be public, we need to untick ‘Block all public access’. As well as switching Object Ownership to ‘ACLs enabled’.

Navigate to the Permissions Tab within your S3 bucket and scroll down to ‘Bucket policy’. Hit Edit, and copy the below, substituting ghost-tutorial for your S3 bucket’s name.
{
  "Id": "Policy1699808965526",
  "Version": "2012-10-17",
  "Statement": [
    {
      "Sid": "Stmt1699808964559",
      "Action": [
        "s3:GetObject"
      ],
      "Effect": "Allow",
      "Resource": "arn:aws:s3:::ghost-tutorial",
      "Principal": "*"
    }
  ]
}
IAM Users
In order for Ghost to interact with our S3 bucket, we need to set up an IAM user!
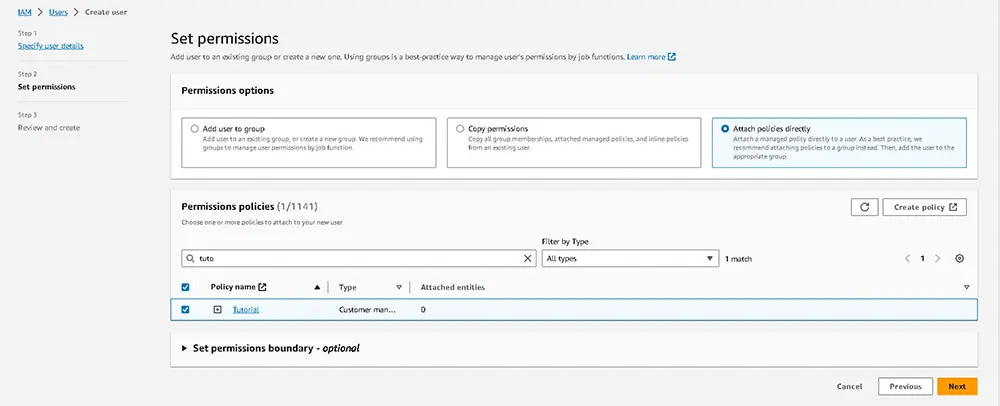
Navigating to the IAM page in your AWS console and hit ‘Create User’. Give the user an appropriate name and leave the checkbox unticked. On the next page, select ‘Attach policies directly’ and then create policy.
Switch the Policy editor to Json and insert the following code, replacing both instances of ghost-tutorial with your S3 bucket’s name:
{
	"Version": "2012-10-17",
	"Statement": [
		{
			"Sid": "VisualEditor0",
			"Effect": "Allow",
			"Action": "s3:ListBucket",
			"Resource": "arn:aws:s3:::ghost-tutorial"
		},
		{
			"Sid": "VisualEditor1",
			"Effect": "Allow",
			"Action": [
				"s3:PutObject",
				"s3:GetObject",
				"s3:PutObjectVersionAcl",
				"s3:DeleteObject",
				"s3:PutObjectAcl"
			],
			"Resource": "arn:aws:s3:::ghost-tutorial/*"
		}
	]
}
Hit next, give your policy a suitable name and then ‘Create policy’. In the previous tab, reload the permissions policies and select the Policy you just created. Hit next, then Create User.
Navigate to your new user's security credentials Tab, and create a new Access key, selecting 'Third-party service' as the use case.
Note the Access key and Secret access key, as we will need these shortly.

With the above steps completed, we can now jump back into our Lightsail instance and complete the last steps!
Connecting S3 and Ghost
To get S3 working with Ghost, we will need to install ghost-storage-adapter-s3 which bridges the gap between the two systems. On your Lightsail instance, navigate to your Ghost directory and run the following commands:
npm install ghost-storage-adapter-s3
sudo mkdir -p ./content/adapters/storage
sudo cp -r ./node_modules/ghost-storage-adapter-s3 ./content/adapters/storage/s3
This puts the adapter in our Ghost installation. However, the permissions need to be adjusted for Ghost to access these files. To do this, run the following commands:
sudo chown -R ghost:ghost ./contentAfter this, I ran the ‘ghost doctor’ command, which diagnoses faults within a Ghost setup. Running this command, I also found an issue relating to the permissions of the aws-sdk folder. Running the following fixed the issue, and my install a clear bill of health:
sudo find ./ ! -path "./versions/*" -type f -exec chmod 664 {} \;With the adapter installed, we can now adjust our Ghost config! Open your config.production.json file with the following command:
sudo nano config.production.jsonAdd the following code snippet to the existing file, substituting in your IAM access and secret key, S3 region, and bucket name:
  "storage": {
    "active": "s3",
    "s3": {
      "accessKeyId": "yourAccessKey",
      "secretAccessKey": "yourSecretKey",
      "region": "awsRegion (eg eu-west-2)",
      "bucket": "ghost-tutorial"
      }
    }
  },
After saving this file back (Ctrl+X, Y, then Enter). You will need to restart your Ghost instance. We can do this with the following command:
ghost restartAfter the restart, your Ghost site will host all newly uploaded images to AWS S3! 🎉
Optional: Migrating domain
If, like me, you created a test ghost instance to a different domain. To push our site live, we’ll need to match our actual domain!
Doing this is straightforward. First, adjust your domain’s A Record to match your Lightsail instance IP, then run the below set of commands from within your Ghost directory:
ghost config url https://yournew.url
ghost setup nginx
ghost restart
Final Thoughts
Overall, I have very much enjoyed the migration over to Ghost! I hope if you’re considering setting up your own site, or just wanting to tinker, the above will get you started. As always, if you have questions about this process, please drop a comment below!